Updating Swift theme
As Swift is not hosted on the WordPress theme repository, one click update is not available. You have to do it manually, there are two ways to do it.
1.Through WordPress dashboard
- Deactivate the theme.
- Delete it.
- Upload the new version.
- Activate.
2.Through ftp or cPanel file manager
- Navigate to wp-content/themes folder in your ftp or file manager.
- Rename the current swift folder to swift-bak ( or anything of your choice).
- Unzip the latest version of the theme you downloaded and upload it to your themes folder.
* Second method is preferred to the first as you can quickly revert back to older version if something goes wrong.
Always have take a backup of your current theme before your proceed with the update or installation, better be safe than sorry.
Installing Swift
There are three ways in which you can Install Swift or any other WordPress theme.
First download the theme from Swiftler’s area to your desktop.
From WordPress using the Administration Panel
- Log in to the WordPress Administration Panel.
- Select the Appearance panel, then Themes.
- Select Install Themes -> upload.
- Now upload the zipped copy of Swift that you have previously downloaded to your machine.
- Now activate the theme.
Using FTP
- Extract the files in Swift zip file.
- Launch your favorite FTP client and connect to your site.
- Upload extracted files in step 1 to wp-content/themes directory preserving the folder structure. wp-content/themes/Swift
- Follow the instructions below for selecting the new Theme.
- Now login to WordPress and goto appearance/themes and activate Swift.
Adding New Themes using cPanel
If your host offers the cPanel control panel
- Download the Swift zip file to your local machine.
- In cPanel File Manager, navigate to your Themes folder. If you have WordPress installed in its own folder called wordpress, you would navigate to “public_html/wordpress/wp-content/themes” and if WordPress is installed in your web-root folder you would navigate to “public_html/wp-content/themes”.
- Once you’ve navigated to the Themes folder in cPanel File Manager, click on Upload file(s) and upload that zip file you saved in Step 1.
- Once the zip file is uploaded, click on the zip file name in cPanel, then in the panel to the right, click on Extract File Contents, and that zip file will be uncompressed.
- Now login to WordPress and goto appearance/themes and activate Swift.
After installing SWIFT
1. Setup navigation menus
Swift has three menus.
Top Navigation menu is located above the logo/site name, Ideal for adding pages like, About, contact, advertise, archives.
Bottom Navigation menu is located below the logo/site name, Ideal for adding categories.
Footer links are located to the left in the first line of the footer, ideal for adding contact us,about, privacy policy, disclaimer etc..
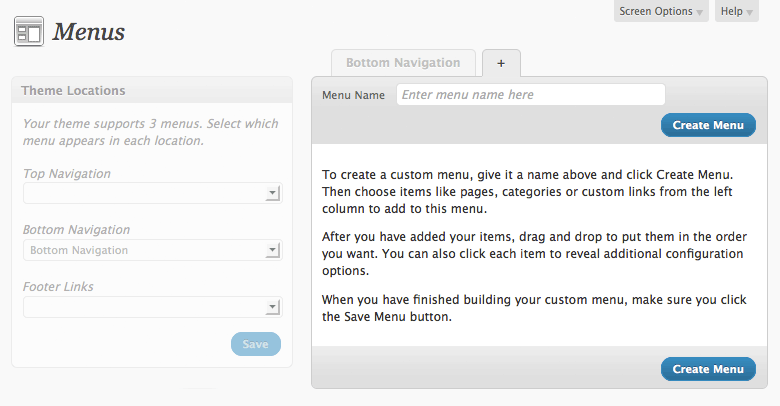
- From the ‘Appearance’ menu on the left-hand side of the Dashboard select the ‘Menus’ option to bring up the menu editor. You should see something like the screenshot below in your browser window
- Enter a name for your new menu in the Menu Name box then click the Create Menu button. I usually name my menus as, top navigation, bottom navigation, and footer links, you can name theme whatever you want.
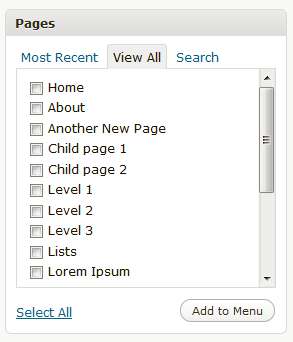
- Adding items to menus, In the left-hand corner of the menu editor screen, you should see a sub-menu titled ‘Pages’ In this sub-menu, click the View Alllink. This will bring up a list of all the pages that are currently published on your site/blog.
- Select the pages you want to add to your menu by clicking the checkbox to the left of each item’s title. In this example, the ‘Home’, ‘About’, ‘Another New Page’, ‘Child Page 1’, ‘Child Page 2’, and ‘Level 1’ Pages will be used. When you have selected the pages you want to include, click the Add to Menu button in the bottom right-hand corner. You should now see a series of boxes, with the page titles of the items you added in the previous step on the left-hand side of each box.
- Click the Save Menu button to save the changes.
- Deleting menu items, To access the options for the relevant menu item, find the corresponding menu item box in the right-hand corner of the menu editor window and left-click on the arrow icon in the top right-hand corner of it. The menu item box should then expand and the options we need to edit should be visible. See the screenshot below for an example.
- Click on the Remove link in the bottom left-hand corner. The menu item box for the menu item you deleted should no longer be displayed.
- Click the Save Menu button to save the changes you have made.
- To create multi level menus ( Drop Downs),
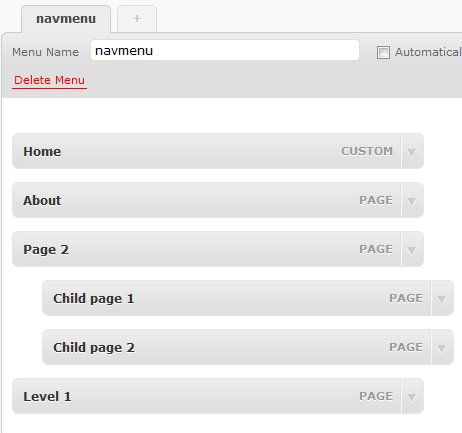
- Position the mouse over the menu item box for ‘Child Page 1’. While holding the left mouse button, drag it to the right then release the mouse button.
- Repeat the above step for ‘Child Page 2’ and make sure that ‘Child Page 1’ and ‘Child Page 2’ are both indented the same distance from the left. Your menu should now look like the one the screenshot below:
- Click the Save Menu button to save the changes. Your new menu, with the structure described in the example, should now be created.
Now goto to Swift Options and Swift Design Options page and go through the options to get an idea of what you can do with Swift. You are stuck, you can refer to the user guide here
Swift has some cool widgets built in and lot of widgetized sections. Goto appearance/widgets to explore them.
Some plugins you will need for optimal performance
Swift uses post thumbnails. For optimal performance you should have post thumbnails set for each post. To save you from the tedious task of setting the post thumbnails manually for each post, Aditya Mooley developed the Auto Post thumbnails plugin. Install this plugin, and generate post thumbnails. This is a very lite weight plugin, and runs only when the post is published.
1.Yet Another Related Posts Plugin (YARPP ) is integrated into Swift. If the plugin is activated, Swift automatically picks it up and add’s it at the end of the post. There are two things you should change in YARPP settings.
- UnCheck “Automatically display related posts”
- Check “Display using a custom template file” and select the template file yarpp-thumbnail-template.php
2. W3 Total Cache to reduce the load on the server and speedup your site. Make sure you configure it correctly. Many users I have seen install it but do not configure it correctly, which makes it useless.
3. WordPress SEO to compliment Swift
That’s it for now, have fun with the fastest WordPress theme, If you have any questions post them in the support forum


