Difference between revisions of "How to load custom fonts locally in Swift Theme"
(→Preparing the fonts) |
(→Using the fonts) |
||
| Line 98: | Line 98: | ||
=== Using the fonts === | === Using the fonts === | ||
| − | Goto design options -> font settings and in custom font stack1 add | + | '''Goto design options''' -> font settings and in custom font stack1 add |
| − | `'Lato', sans-serif;` | + | '''`'Lato', sans-serif;`''' |
if you are using more than one font, add the next stack to custom font stack2. | if you are using more than one font, add the next stack to custom font stack2. | ||
Save changes and reload to the options page. Your font stack will now be available font family field. | Save changes and reload to the options page. Your font stack will now be available font family field. | ||
| + | |||
| + | [[File:Adding custom font stack in Swift premium theme.jpg]] | ||
Now customise your typography according to your liking. | Now customise your typography according to your liking. | ||
Latest revision as of 12:51, 4 October 2015
Swift gives you option to select from over 600 fonts available on [google fonts https://www.google.com/fonts], but for whatever reason if you choose to use a font you downloaded form other source or just want to load the google fonts locally from your server. Then this tutorial is for you.
In this tutorial we will show you how to load the Lato font locally.
Getting the font
You can download the Lato web fonts directly from [latofonts.com http://www.latofonts.com/lato-free-fonts/] When using custom fonts, you should atlas have the bold and italic variants of the font.
Preparing the fonts
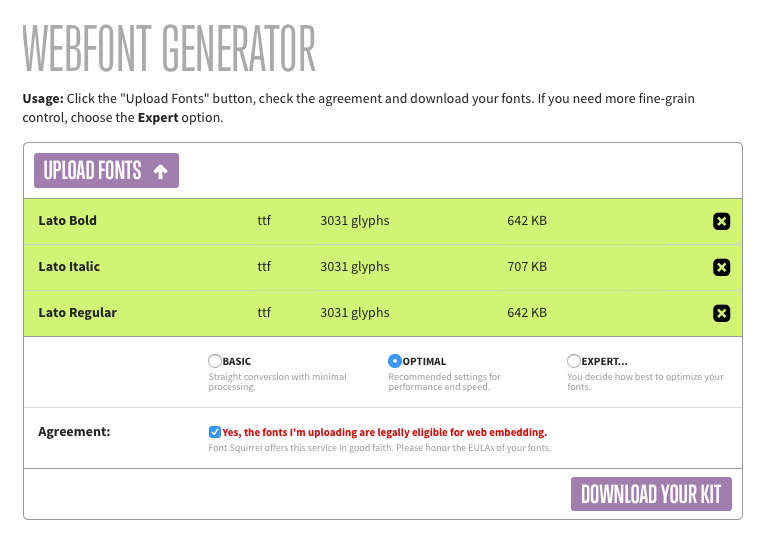
Convert the three font weights into web fonts using this [convertor http://www.fontsquirrel.com/tools/webfont-generator]

Loading the fonts
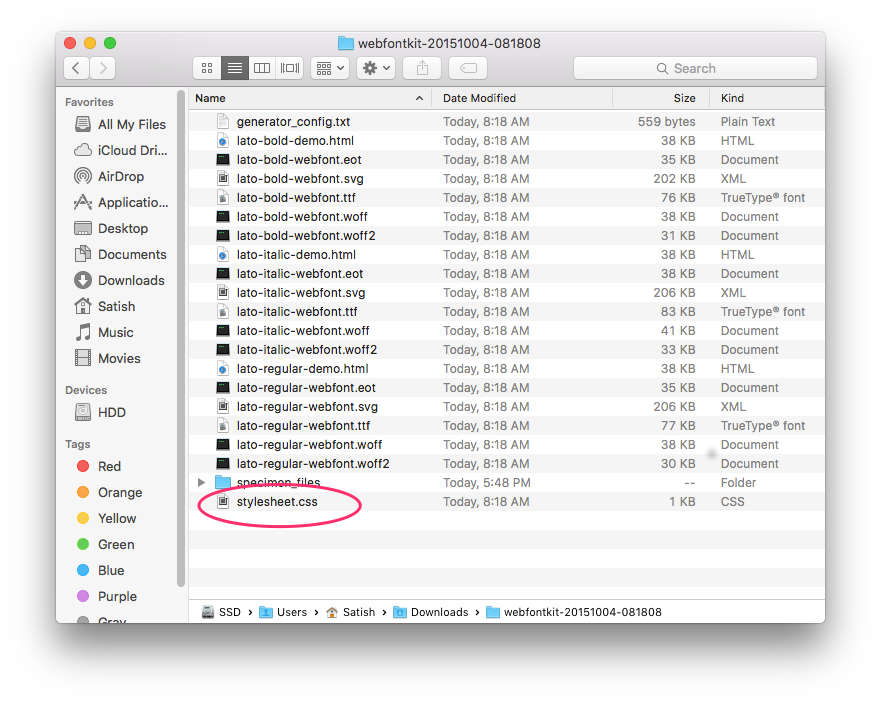
In the downloaded file you will have a file named stylesheet.css with the following content

/* Generated by Font Squirrel (http://www.fontsquirrel.com) on October 4, 2015 */
@font-face {
    font-family: 'latobold';
    src: url('lato-bold-webfont.eot');
    src: url('lato-bold-webfont.eot?#iefix') format('embedded-opentype'),
         url('lato-bold-webfont.woff2') format('woff2'),
         url('lato-bold-webfont.woff') format('woff'),
         url('lato-bold-webfont.ttf') format('truetype'),
         url('lato-bold-webfont.svg#latobold') format('svg');
    font-weight: normal;
    font-style: normal;

}
@font-face {
    font-family: 'latoitalic';
    src: url('lato-italic-webfont.eot');
    src: url('lato-italic-webfont.eot?#iefix') format('embedded-opentype'),
         url('lato-italic-webfont.woff2') format('woff2'),
         url('lato-italic-webfont.woff') format('woff'),
         url('lato-italic-webfont.ttf') format('truetype'),
         url('lato-italic-webfont.svg#latoitalic') format('svg');
    font-weight: normal;
    font-style: normal;

}
@font-face {
    font-family: 'latoregular';
    src: url('lato-regular-webfont.eot');
    src: url('lato-regular-webfont.eot?#iefix') format('embedded-opentype'),
         url('lato-regular-webfont.woff2') format('woff2'),
         url('lato-regular-webfont.woff') format('woff'),
         url('lato-regular-webfont.ttf') format('truetype'),
         url('lato-regular-webfont.svg#latoregular') format('svg');
    font-weight: normal;
    font-style: normal;
}
Change the font family name to late in the 3 sections, and change the font weight and style according to the font name.
The CSS you should be using will be
Be sure to update the font paths
/* Generated by Font Squirrel (http://www.fontsquirrel.com) on October 4, 2015 */
@font-face {
    font-family: 'lato';
    src: url('lato-bold-webfont.eot');
    src: url('lato-bold-webfont.eot?#iefix') format('embedded-opentype'),
         url('lato-bold-webfont.woff2') format('woff2'),
         url('lato-bold-webfont.woff') format('woff'),
         url('lato-bold-webfont.ttf') format('truetype'),
         url('lato-bold-webfont.svg#latobold') format('svg');
    font-weight: bold;
    font-style: normal;

}
@font-face {
    font-family: 'lato';
    src: url('lato-italic-webfont.eot');
    src: url('lato-italic-webfont.eot?#iefix') format('embedded-opentype'),
         url('lato-italic-webfont.woff2') format('woff2'),
         url('lato-italic-webfont.woff') format('woff'),
         url('lato-italic-webfont.ttf') format('truetype'),
         url('lato-italic-webfont.svg#latoitalic') format('svg');
    font-weight: normal;
    font-style: italic;

}
@font-face {
    font-family: 'lator';
    src: url('lato-regular-webfont.eot');
    src: url('lato-regular-webfont.eot?#iefix') format('embedded-opentype'),
         url('lato-regular-webfont.woff2') format('woff2'),
         url('lato-regular-webfont.woff') format('woff'),
         url('lato-regular-webfont.ttf') format('truetype'),
         url('lato-regular-webfont.svg#latoregular') format('svg');
    font-weight: normal;
    font-style: normal;
}
Using the fonts
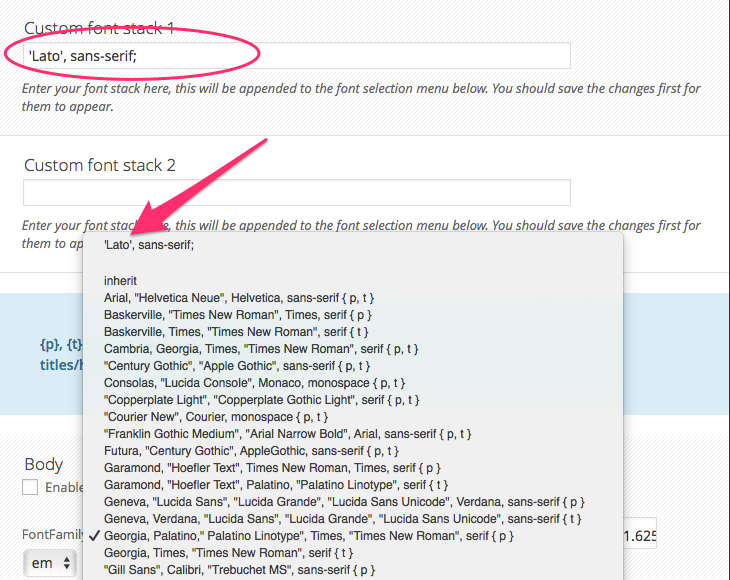
Goto design options -> font settings and in custom font stack1 add `'Lato', sans-serif;` if you are using more than one font, add the next stack to custom font stack2.
Save changes and reload to the options page. Your font stack will now be available font family field.
Now customise your typography according to your liking.
